


Make Your Own Cardboard TV—All You Need Is a Box
When I was young, my mom always told my brother and me that “too much TV was gonna rot our brains and ruin our creativity.” That’s usually when we went outside and made our own entertainment. I’m never one to argue with moms. However, what if there were a way to bring the creativity back to your TV? I’m not talking about a new streaming service. Instead, I’m suggesting we look to the original “you” tube by making a cardboard TV.
As a dad of two girls and as a kindergarten teacher, I can tell you any project with cardboard is definitely a win. It’s easy, cheap, and best of all, it makes young brains figure stuff out while also encouraging creativity. All you need is a few basic supplies to recreate this cardboard TV on your own. Then you’ll be enjoying the best local programming available. Check out how this project came together below.
What You’ll Need:
- Cardboard
- Tape
- Hot glue gun
- Scissors or box cutter
- Permanent marker
- Straight edge (for A-type people, like me)
Step 1: Find a box for your cardboard TV.
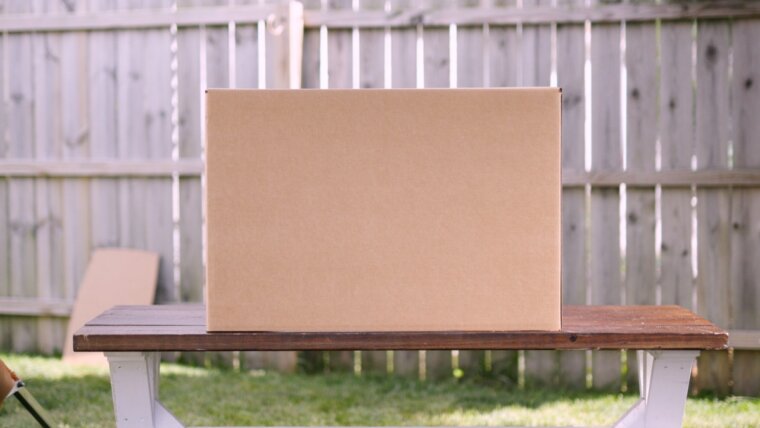
You can use just about any box, but you definitely want to go big if possible! The box we used was around 36 inches by 24 inches by 24 inches. If you can recycle a box you already have, even better! If you want to get a box specifically for this project, try a local shipping center or large hardware store. They’ll have lots of options that are affordable, too. Once you pick the perfect box, tape the bottom together. Cut off the top flaps so you have a freestanding box with the top left open. Then save those flaps later on, for step 3.
Step 2: Cut out your screen opening.
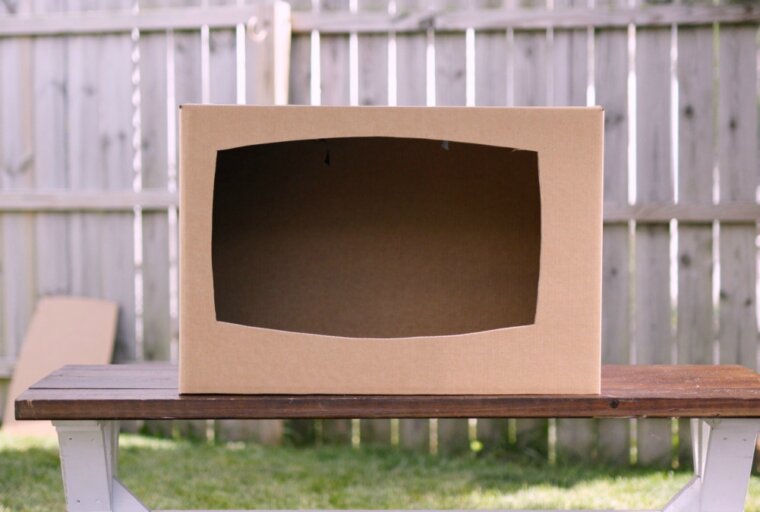
If you have a more square-shaped box, then you’ll want to go square for the opening. For this project, our box was more rectangular, so we went with a rectangle-shaped screen opening. I liked the look of a classic curved TV tube and added a bit of a curve to my screen. To do this, I used a yardstick and bent the edges for a nice, smooth, sloping curve. Use a pencil to trace the shape; go light in case you need to erase mistakes. Once you’re happy, use scissors or a box cutter to cut out the opening.
Step 3: Make your television knob.
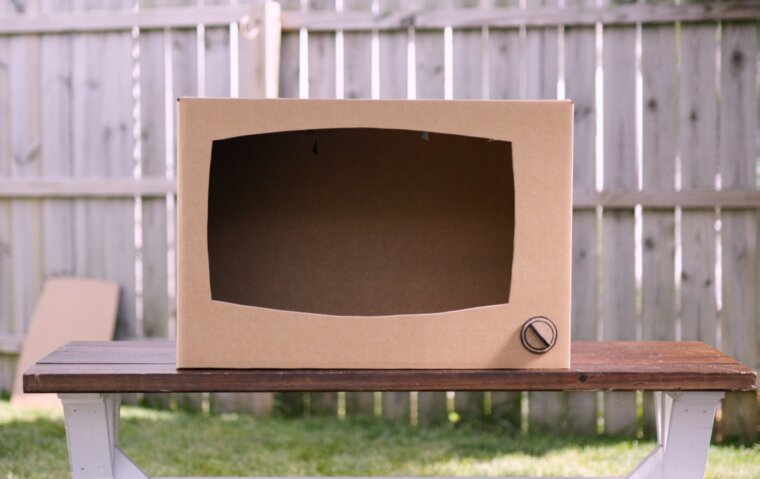
The knob for the TV is easy to make just by cutting three circles that would fit one on top of another. Use the top flaps from step 1 for similar thickness and look. Put together with a hot glue gun. Then outline the edges with black permanent marker to help it stand out.
Step 4: Make your antenna V shape.
A V shape is simple and works really well for the main antenna. Again, use extra flap pieces from step 1 for this step. Lightly sketch your V with a pencil by creating one large V first, then cut out the shape with scissors or a box cutter. Cut a one-inch slot at the bottom center of the V shape. The slot should be the cardboard’s amount of thickness and will slide onto the antenna base in the next step. To help the antenna show up better, you can also outline it in permanent marker.
Step 5: Make your antenna base.
The second part of the antenna is the dome-shaped base. Cut two large circles of equal size from those cardboard flaps from step 1. Cut one of the circles in half. Take the halves and cut complementary slots, about the thickness of a piece of cardboard, on each half-circle (one from the center of the outer circle halfway in; the other from the flat center out halfway toward the curved edge). Slot the half-circles together, using a hot glue gun to adhere the dome piece to the other full circle. Then outline the edges with black permanent marker to help it stand out. Slide the antenna V shape onto the dome and glue in place with hot glue.
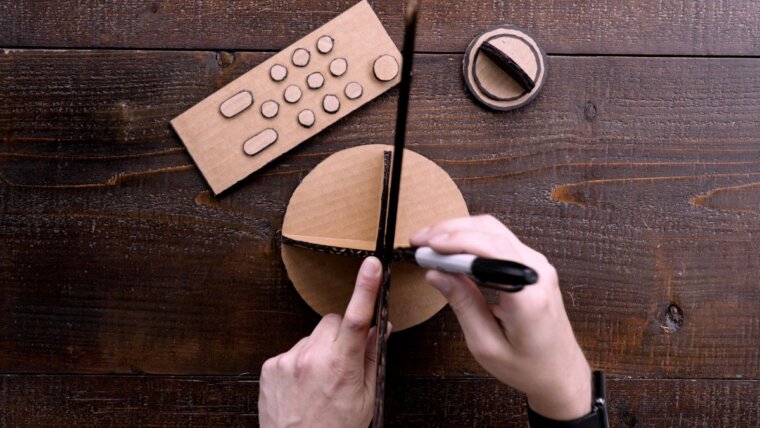
Step 6: Make a remote.
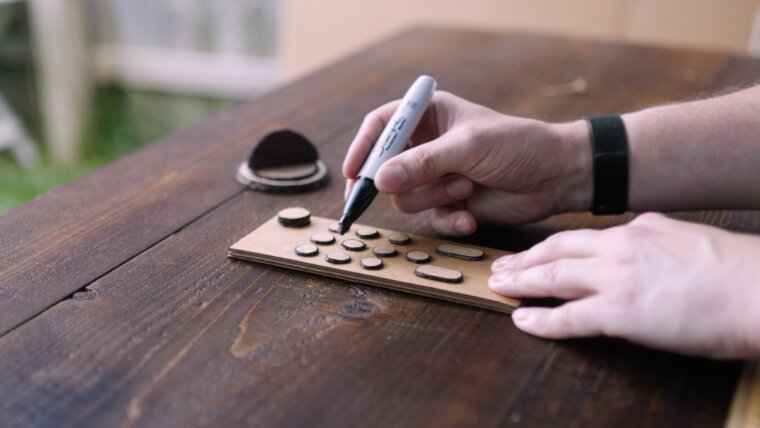
The remote is so fun to create. You can make it as big or as small as you’d like. I went with an oversized remote for this one and used the last of my step 1 top-flap pieces to make it. Trace out a rectangle. Then cut out a couple of different sizes of circles for buttons (several of them). I also cut out longer button shapes for volume and channel buttons. Then, space them out as you’d like, making your personal remote-button layout. There really is no right or wrong way to do this, so have fun and make it your own.
Step 7: Put it all together, and you have a cardboard TV.
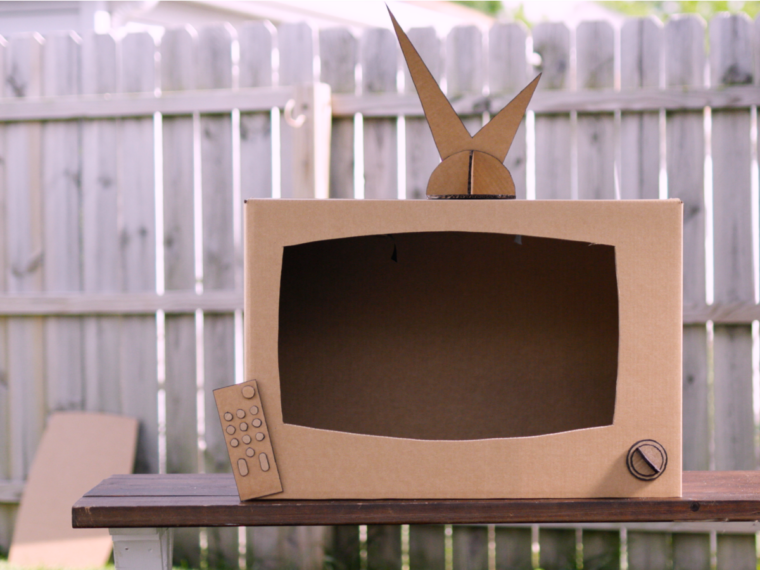
Now that you have all of your pieces made, it’s time to put them together and complete your TV. Add your knob to the lower left or right corner outside the screen hole. Next, put the antenna on top of the TV. Lastly, add the remote, and you’re ready to watch TV, make your own show, or anything else you can dream up. Action!
Love making stuff out of cardboard? Be sure to check out the global cardboard challenge.
If you’re looking for more old-school fun, check out this paper airplane learning kit.


Comments are not active.